CODAPPS
Testing and releasing your app for iPhones
last modified: 2018-03-16
'Escape' or 'o' to see all sides, F11 for full screen, 's' for speaker notes
1. Preliminary setup
|
As explained in the first lesson of this module, here are your options:
paying 99$ (per year) to access Apple’s Developer program.
this allows you to test your app on your own phone
you can release your app on the App Store if Apple judges that your app is "good enough"
access an iOS Developer University Program
this allows you to test your app on your own phone for free
you cannot release your app on the App Store (unless you pay the 99$ of course)
Codename One provides straightforward help and tutorials for case a. Have a look:
Or visit the corresponding web page.
In this lesson, we focus on case b.
Emlyon business school students have access to the iOS Developer University Program and we will see here how to use it.
If you are in a different school, ask your administration how they could set up such a program! (it is free).
Make sure you have an hour ahead of you, some tea or coffee and plenty of patience. This is going to be a long road.

2. The long road
The app, once published on the the Apple App Store, will be public. Make sure your app does not include personal content (pictures, personal details…) that you do not want to get public! |
a. Getting access to the Apple Developer Console
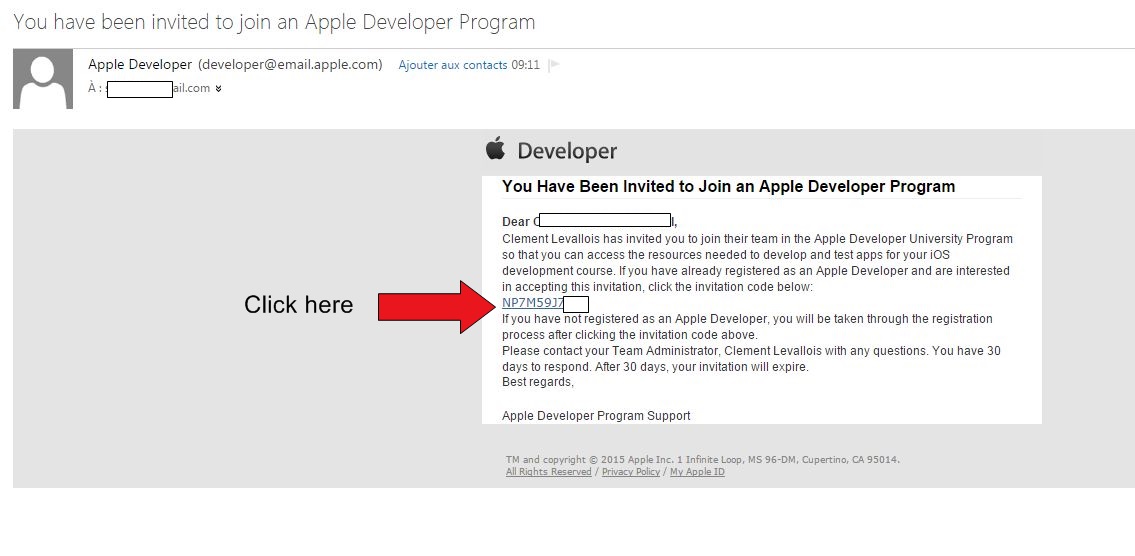
You have received an email inviting you to join an Apple Developer program : If you don’t find this email, check your spam folder !

Open this email, click on the link :
On the page that opens, choose "I need to register as an Apple Developer"

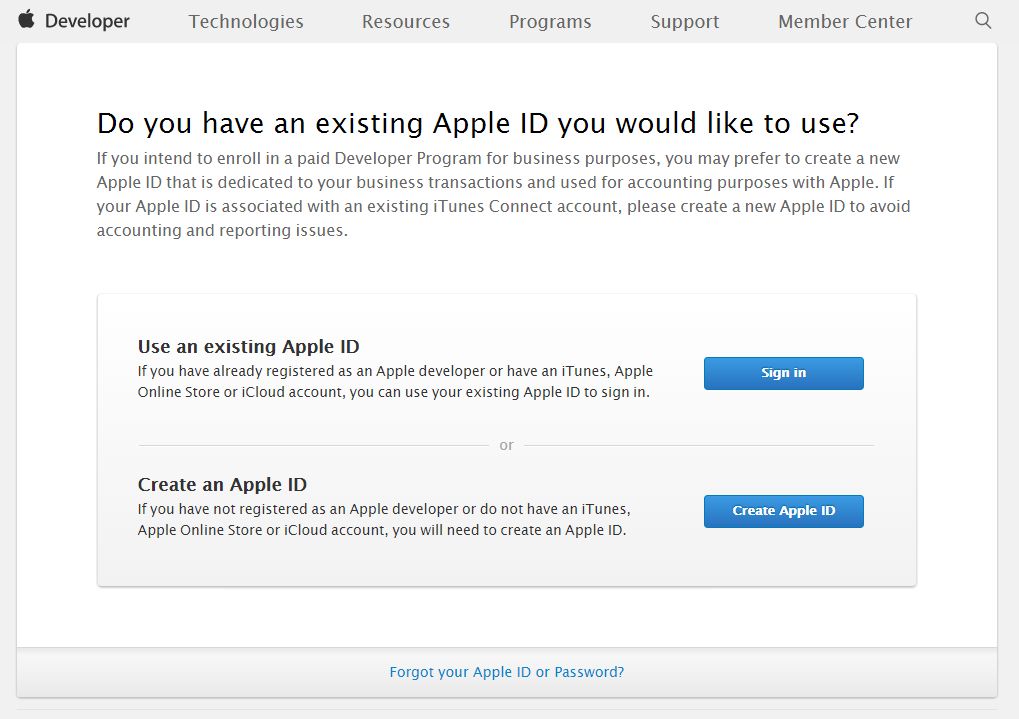
Then you arrive on a screen that asks you to use your Apple id:
If you have an Apple Id (because you own a Mac, or an iPhone, or because you use iTunes…), choose "sign in"
If you don’t have an Apple id, choose "Create an Apple Id"
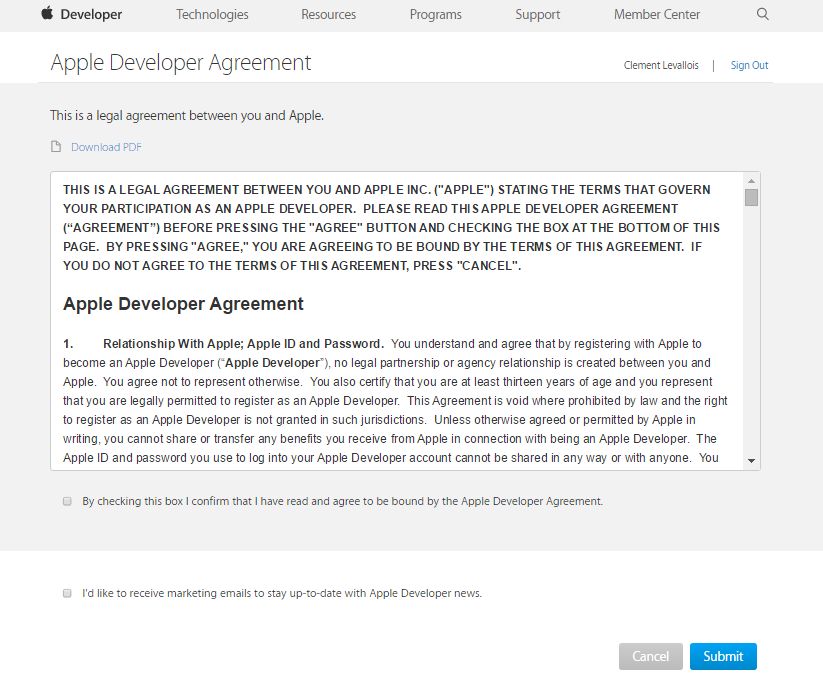
Then you need to agree on the license:
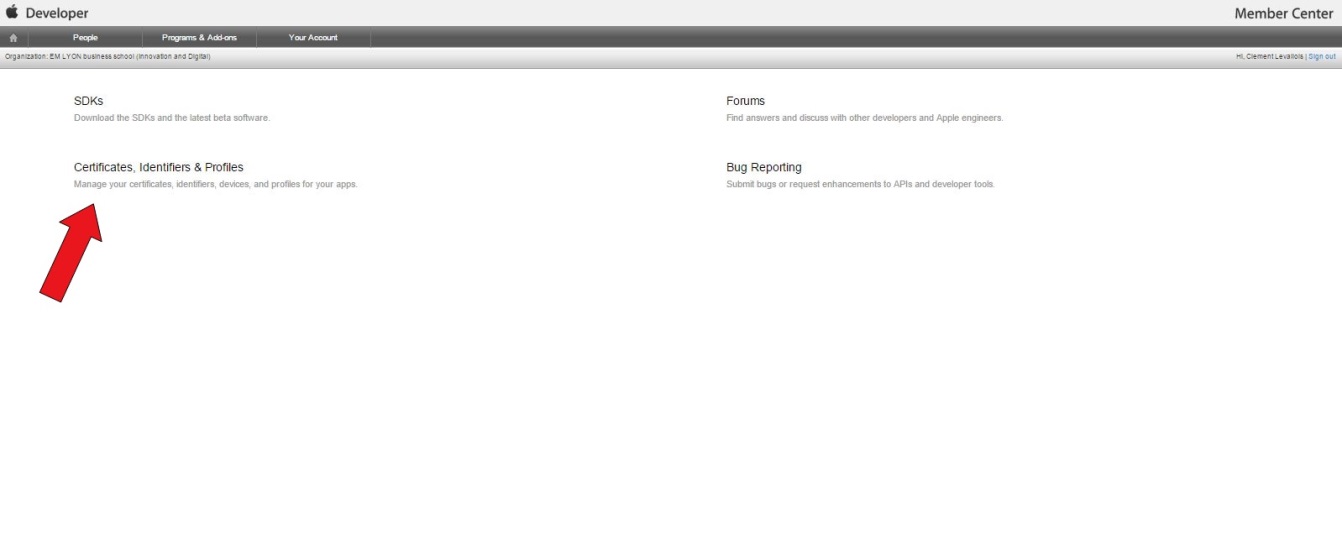
You should be redirected to this page, which is the place where you manage the certificates of your apps for iPhones.
Congratulations, that’s already a big step!
b. Generating a certificate request
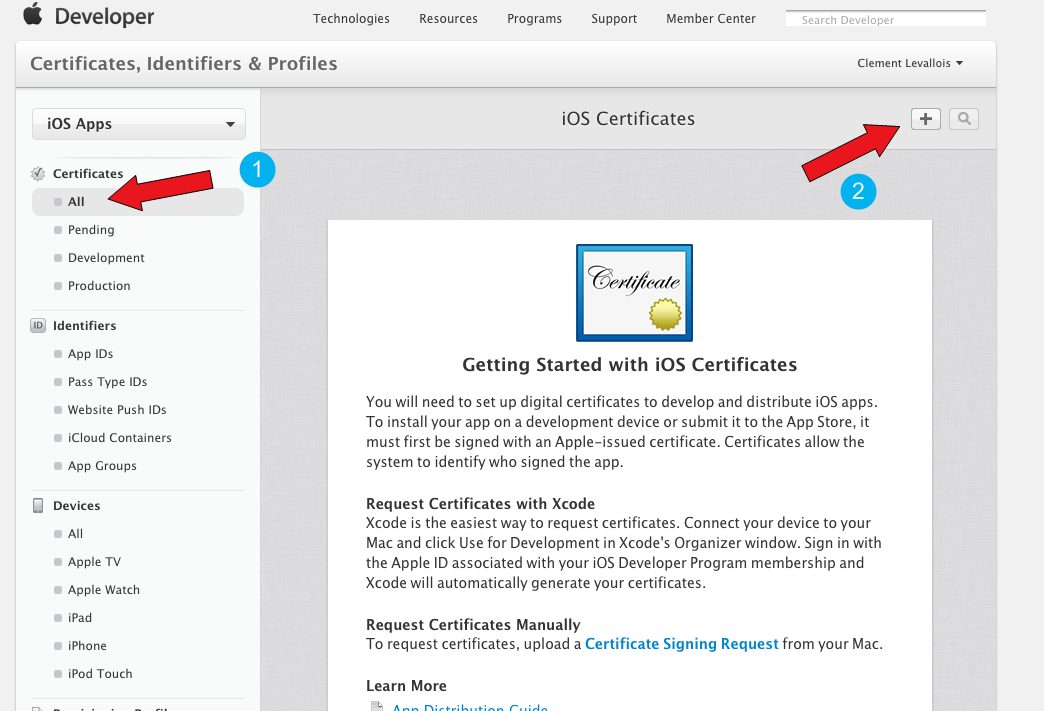
Click on 'Certificates, Identities and Profiles'
Click on Certificates → All then click on the + sign, to add a new certificate for your app :
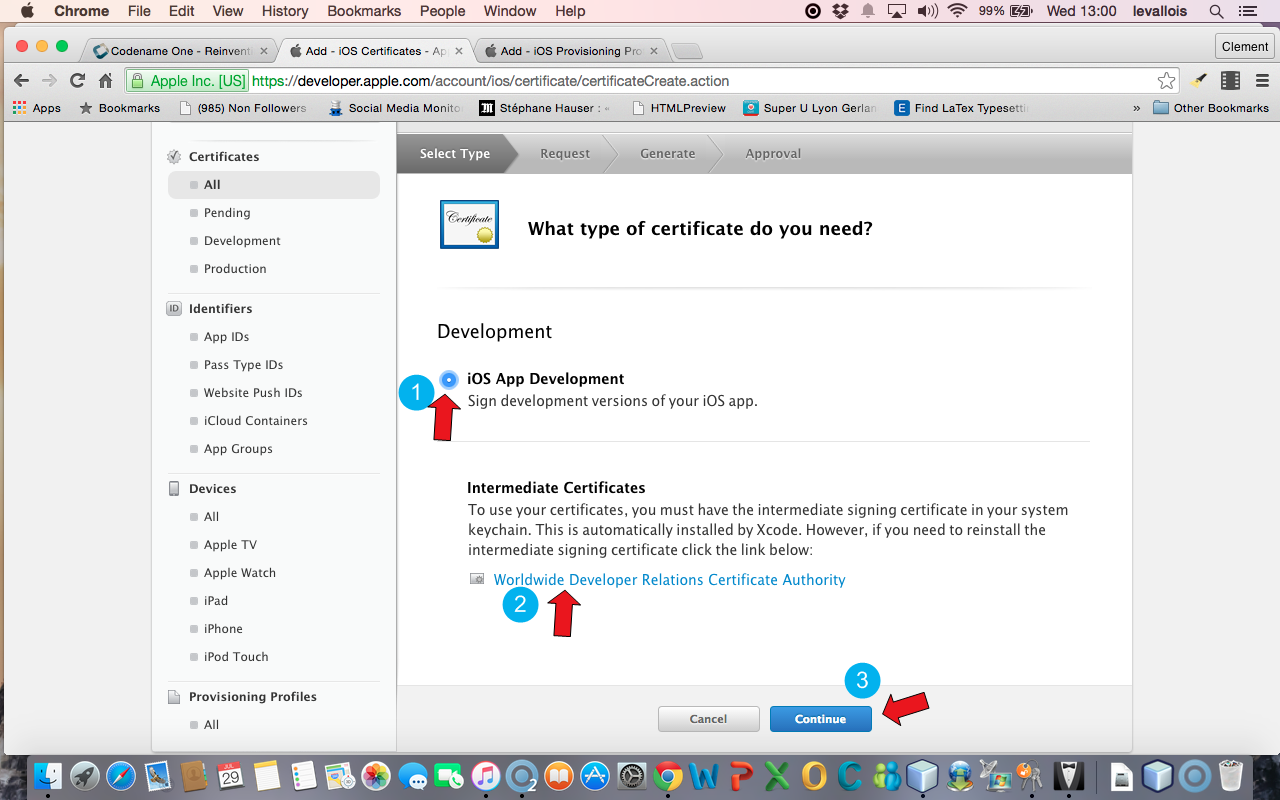
Choose "iOS App Development",
click on "Worldwide Developer Relations Certificate Authority"
it will download a file on you computer.
Then click on "Continue"
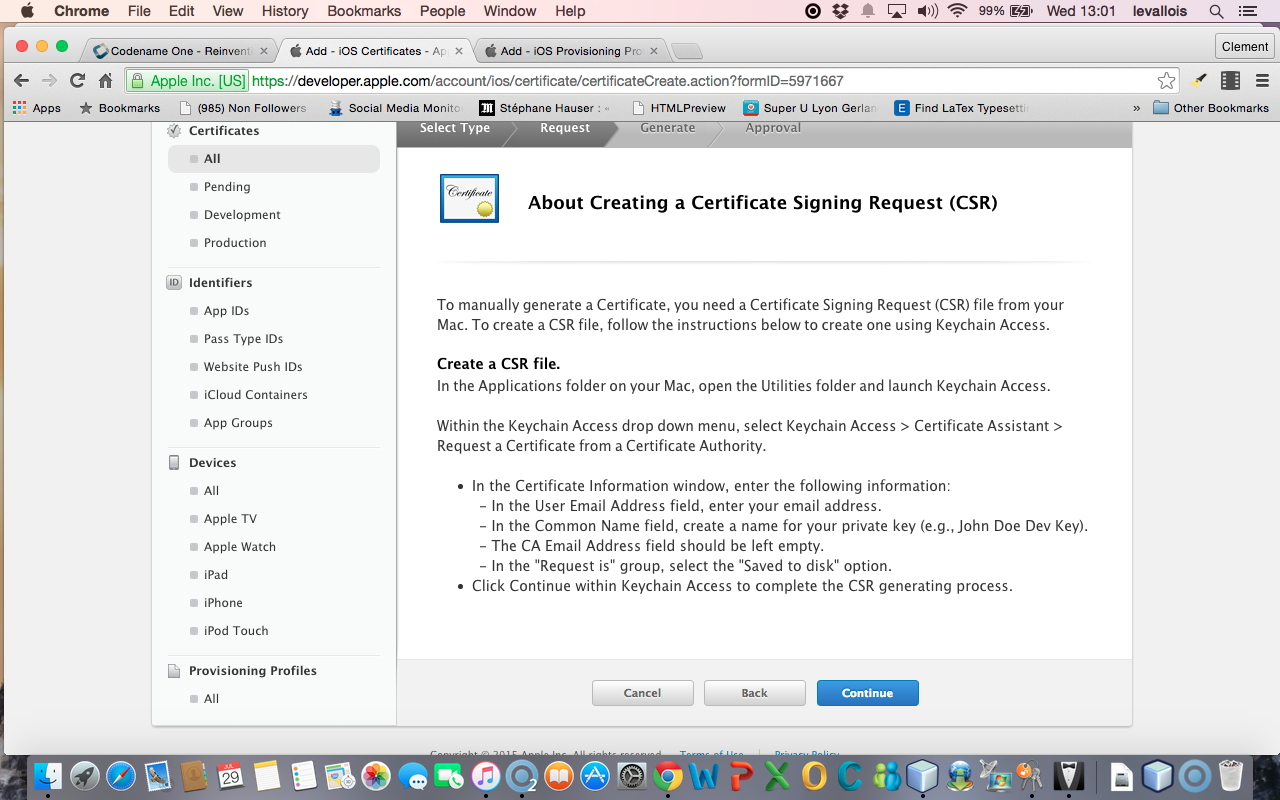
You should arrive on this screen, stay on it:
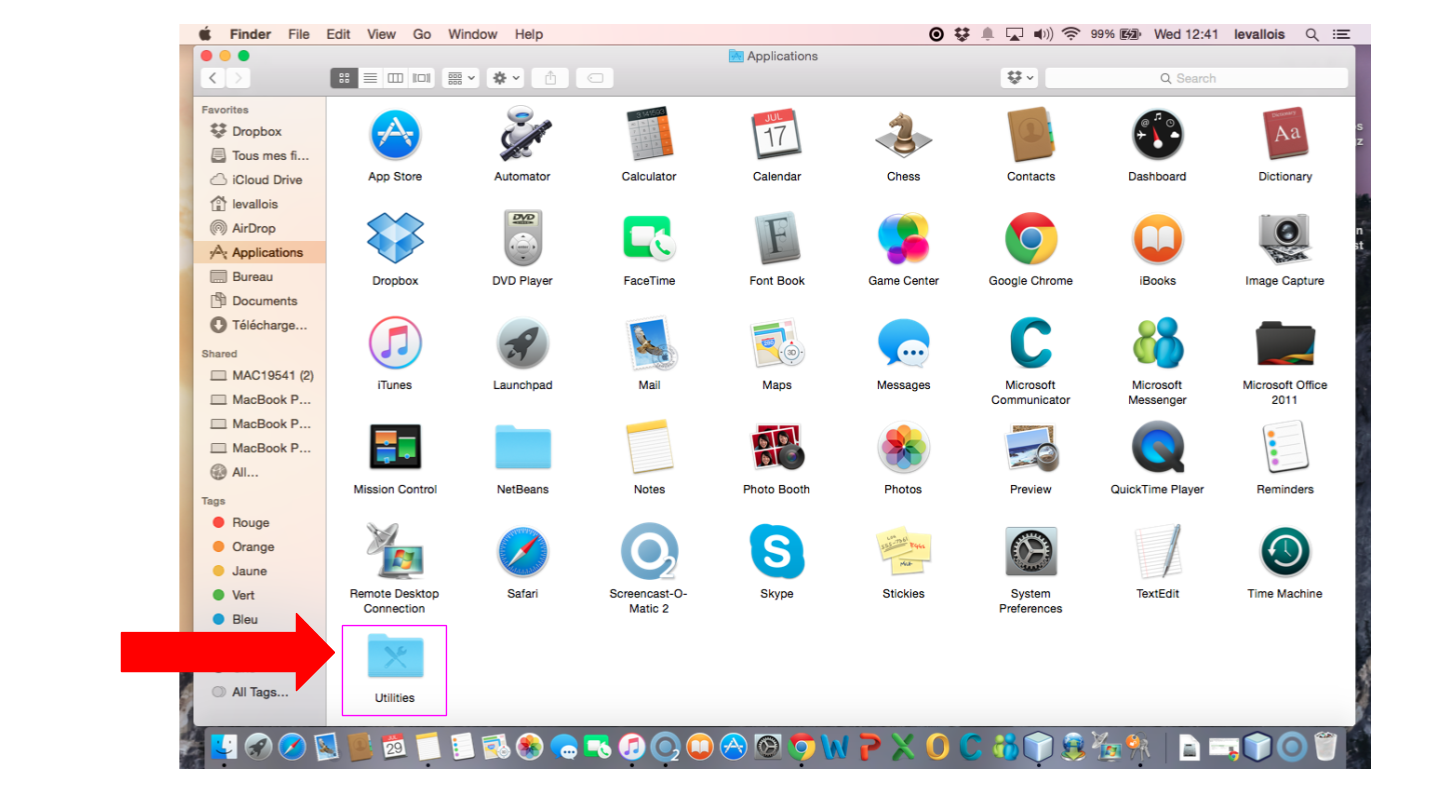
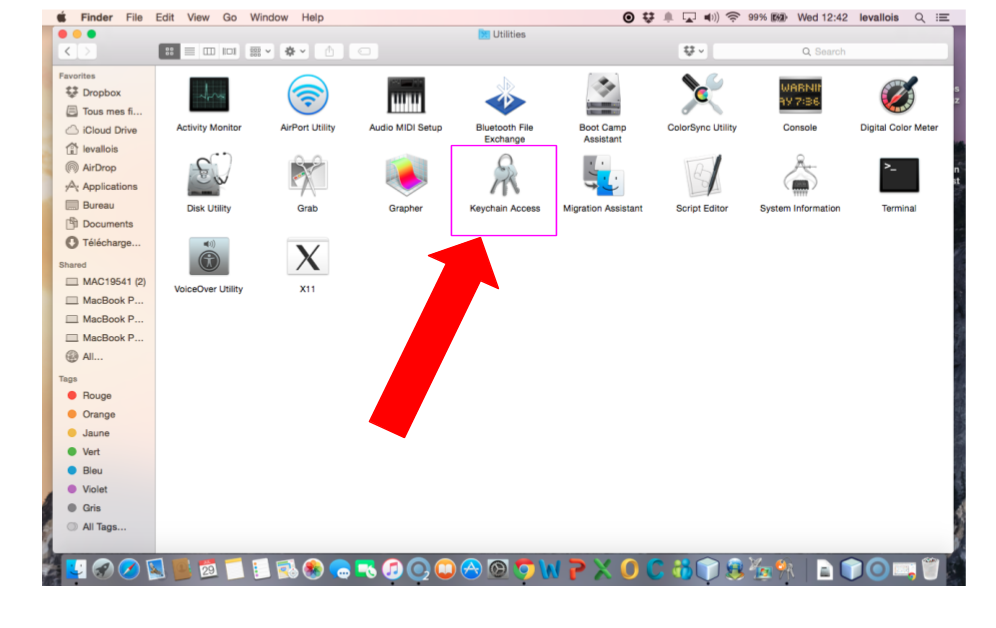
In the Finder on your Mac, open the Applications folder ( ), and inside it, open the "Utilities" folder:
In the "Utilities" folder, open the Keychain access:
In the window that opens, select in the menu "Keychain access → Certificate Assistant → Request a Certificate from a Certificate Authority":
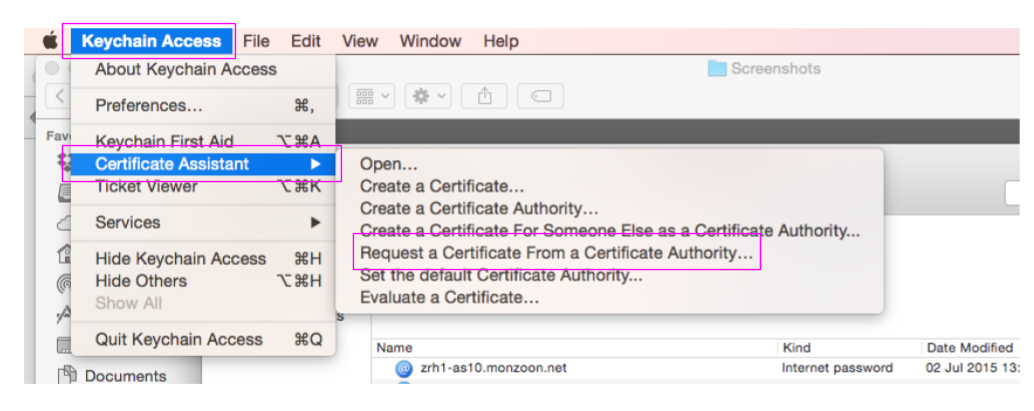
In the small window that opens:
In the field "User email address", put the email address of your Apple ID
In the field "Common Name", put your emlyon email address
Then choose "save to disk" and click on "continue".
I suggest you create a folder somewhere on your computer called "Apple certificates", where you will save the file.

Now, let’s go back to the website of the Apple Dev Center, where we can continue where we left !
If there is an error on the page, it just means that the page expired. Just reload it, and go back to the screen where we left |
Upload the file "CertificateSigningRequest.certSigningRequest" that you just saved on your disk:
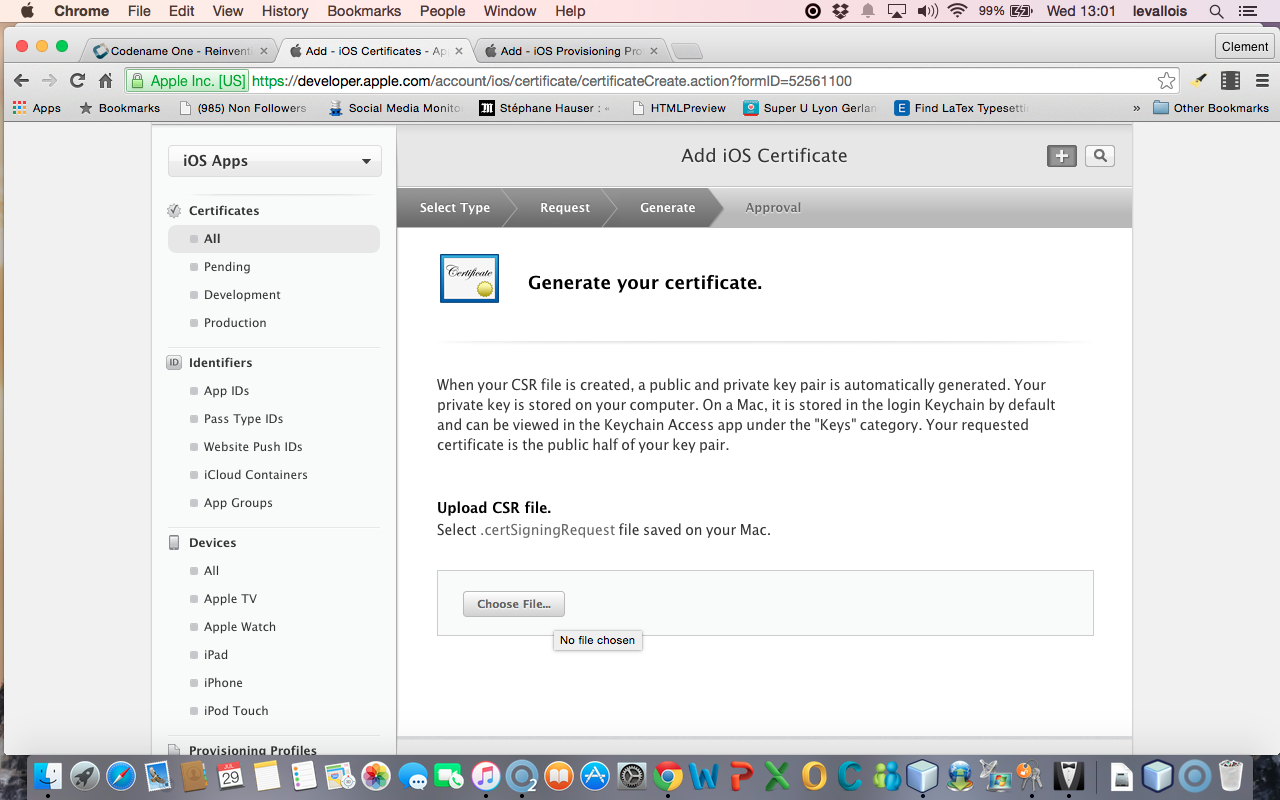
This upload is the step that creates your certificate. Congratulations! That’s also a big step you just accomplished!
c. Using the certificate
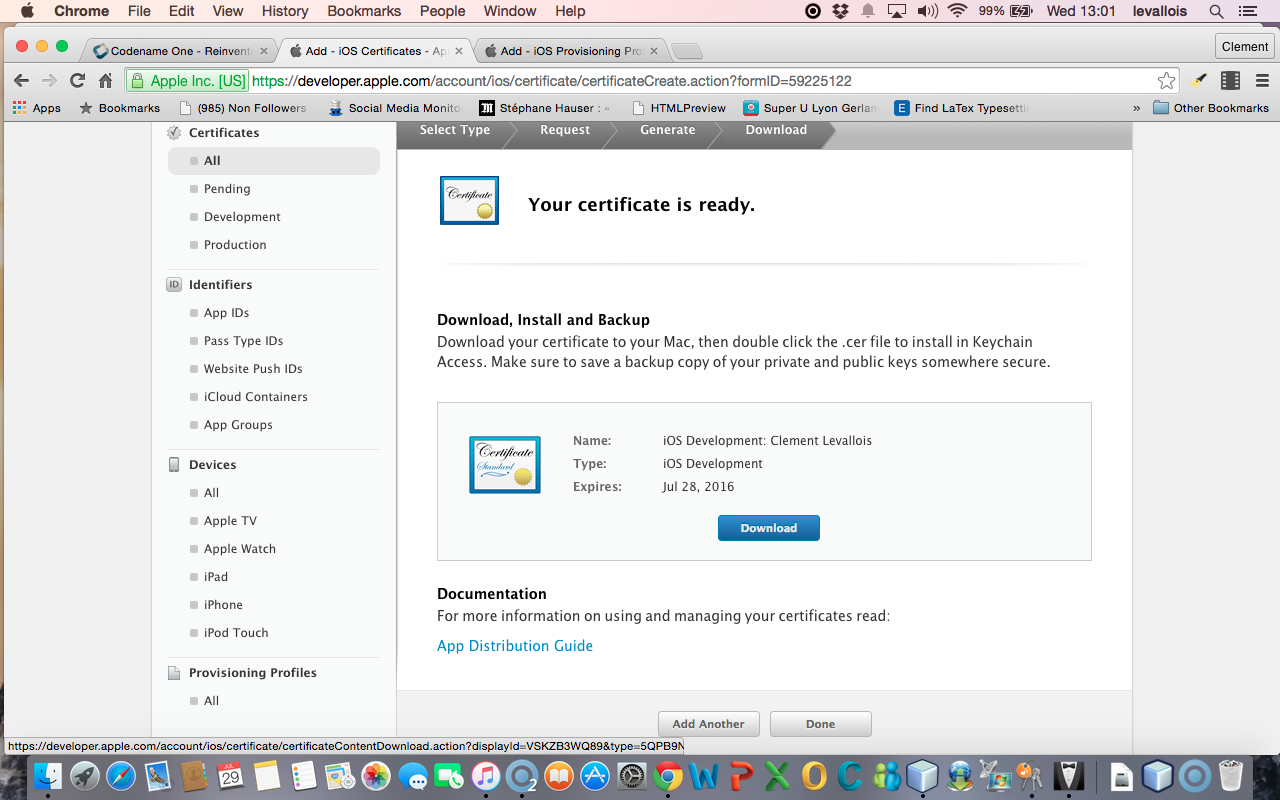
Now download the certificate to your disk, in the same folder. It should be called "ios_development.cer":
Find your file "ios_development.cer" where you saved it. Double click on it. This will open the Keychain access:
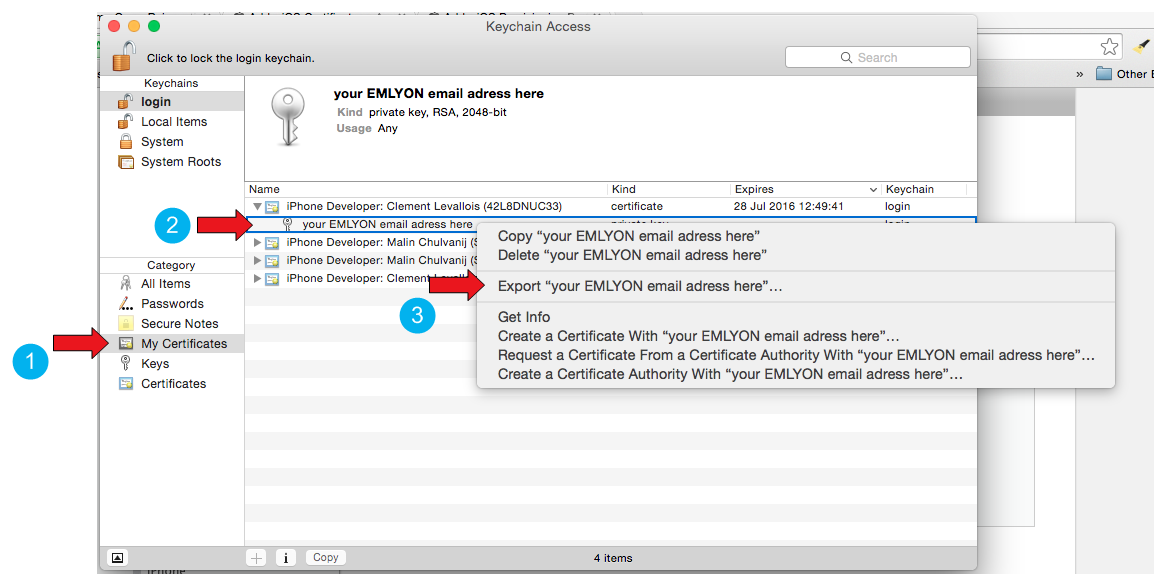
click on "Certificates" in the left menu
Right click on the name of your certificate and choose "Export…"
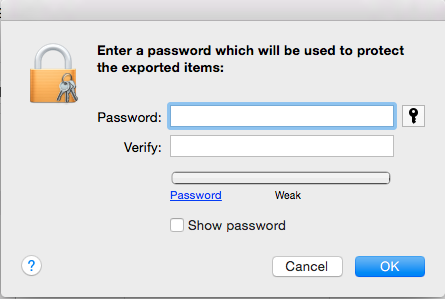
This opens a window asking for a password. Put "emlyon1000":
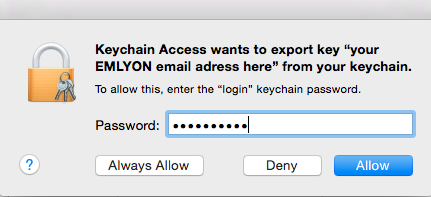
Then on the next screen you are asked again for a password.
You should use the password of your Mac computer (the one you use to login when the computer starts) :
You are invited to save a file on your disk. This is a file with "p12", save it in the same folder where you saved your other files for this certificate.
d. Getting the UDID of your phone
We need the UDID of your phone, the one where you will install and test your app.
The UDID is the unique identifier of your iPhone. You can find it by plugging your phone to iTunes. A very simple tutorial explains it here : http://whatsmyudid.com/
Once you have your UDID, write it to me here: http://goo.gl/forms/mmotEWvRYs
And now wait just a couple of days… I need to collect all UDID from students before I create “Provisioning Profiles” (yes, this process is long and horrible, but we are NEARLY there!).
I’ll send you an email when you can resume this lesson, at the step just below: "Downloading a provisioning profile"
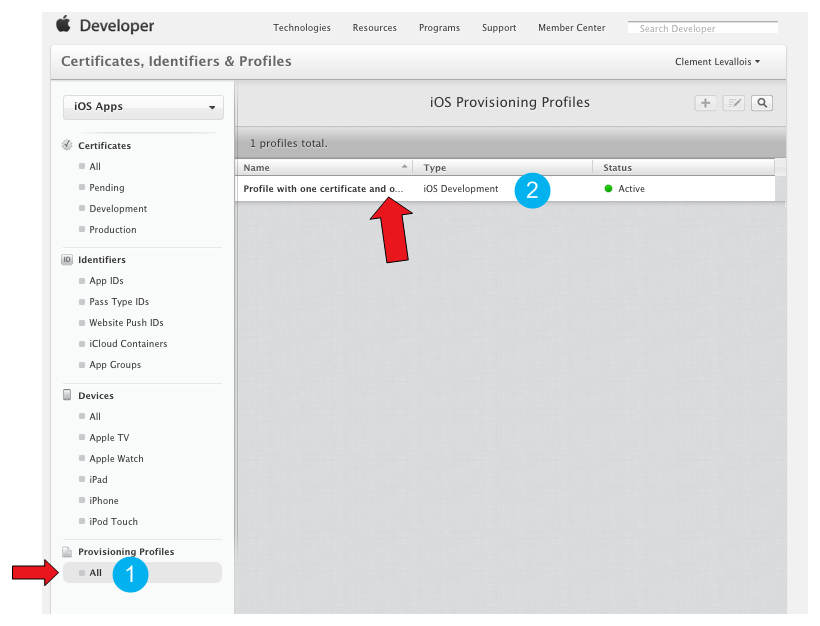
e. Downloading the Provisioning Profile
Go to “Provisioning Profiles” and download the most recent one:
I advise you to download it to the same folder where you saved the previous files created in this tutorial, related to certificates. |
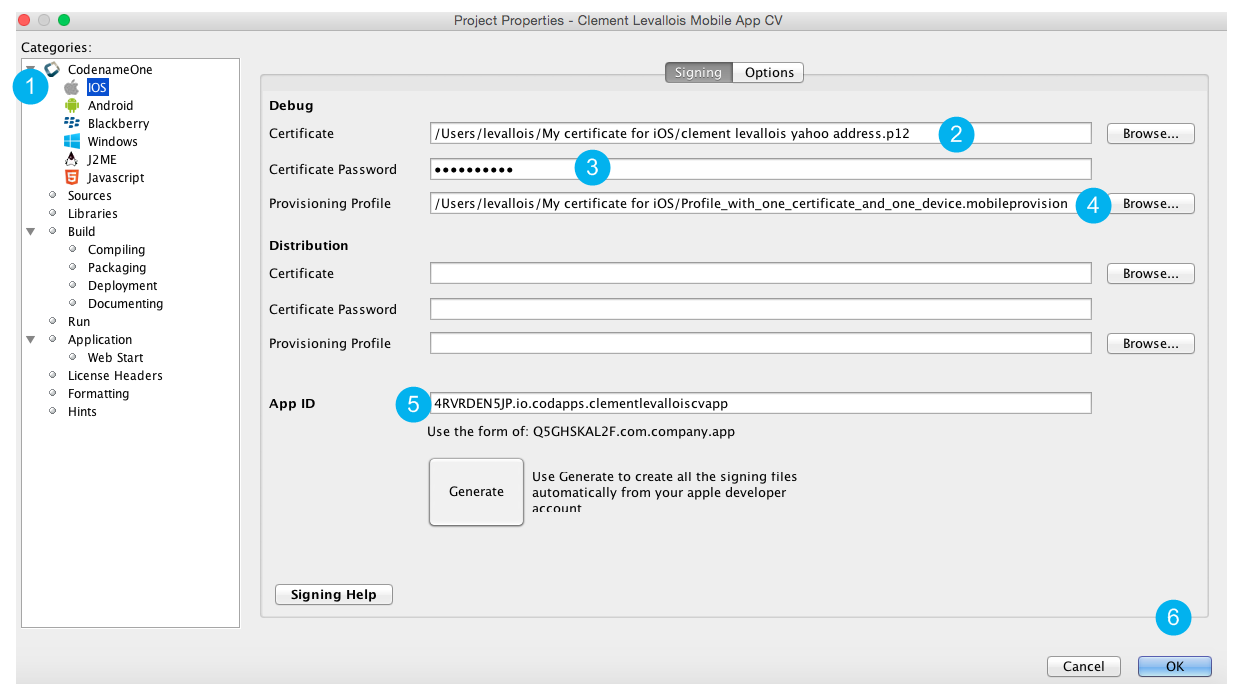
Now, open NetBeans, right click on the name of your project, and select “Properties” (last item at the bottom).
Please check the screenshot below and the numbered steps, and read the indications for each of them:
Select “iOS” on the menu on the left
For Certificate, choose the file with the name ending in “p12” that you saved on your computer in this lesson
For Certificate password, write “emlyon1000”
For provisioning profile, choose the one we just downloaded
In app ID, you must add “4RVRDEN5JP.” Just before io.codapps
Validate
3. The end of the road: sending your build to Codename One
The version of your app that you will build to install on your iPhone is considered to be for the purpose of testing and debbuging.
For this reason, we will call it the "iOS debug build".
Launch the iOS debug build by right clicking on your project’s name:

If you get a "Build failed" message at the end, don’t worry this is very common not to succeed at the first time.
Read the lesson in this module about possible causes and solutions.
If you get a successful build, continue here:
Now you should open your web browser, go to http://www.codenameone.com and login to your account.
Then go to the Dashboard:
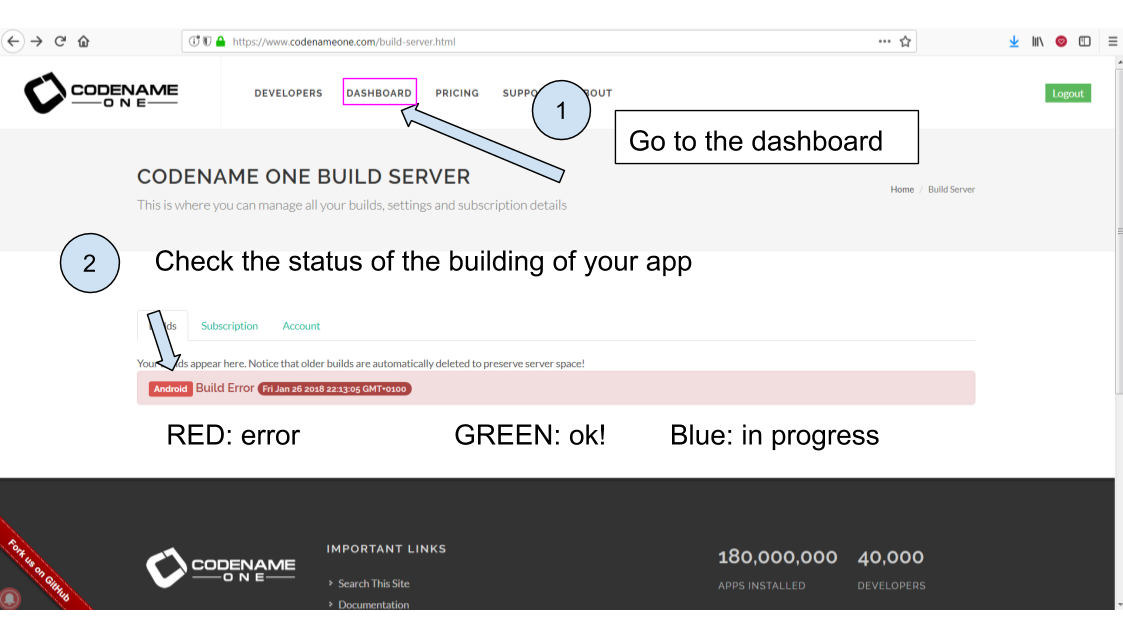
If the build is green and successful, you can go ahead and follow the next instructions below.
If it is red, again this is quite usual the first times. You can read the special lesson in this module to help you diagnostic and solve the error.
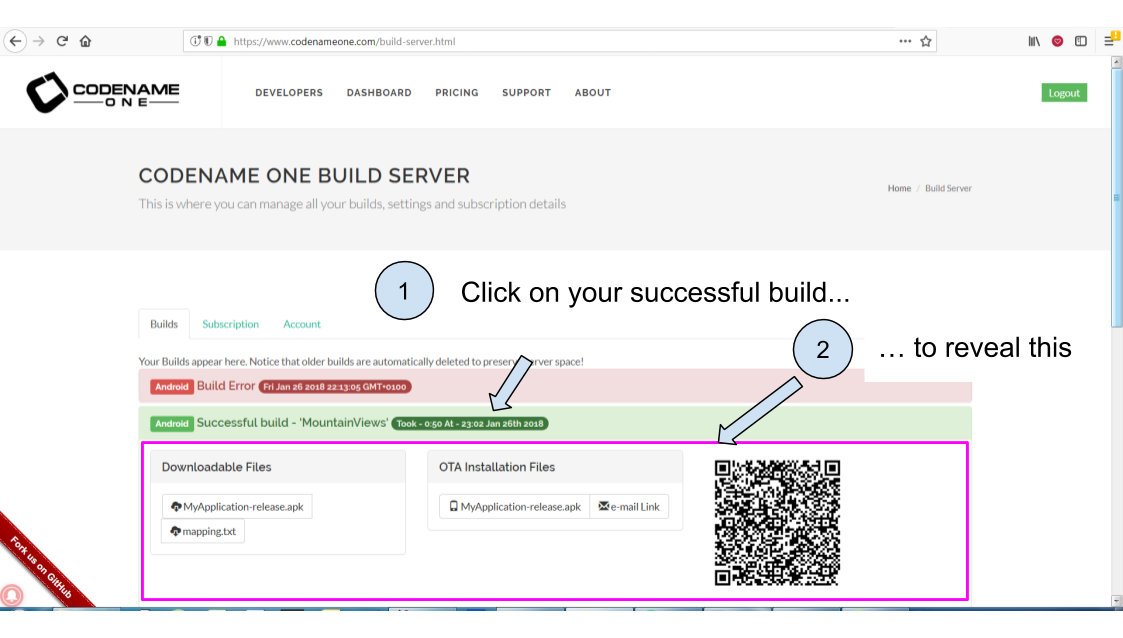
Ok, assuming your build was successful and "green", click on the date and time shown on it:
And now, you can simply test your app on your iPhone.
Let’s see how:
4. Installing the app on the iPhone
Take your phone and open the QR code reader app that you installed on it.
Flash the QR code displayed on your successful build on www.codenameone.com.
Your app should install on your phone (follow the steps / confirm)
go and find the icon of your app on your phone, open it and enjoy it!
The end
Questions? Want to open a discussion on this lesson? Visit the forum here (need a free Github account).
Find references for this lesson, and other lessons, here.
Licence: Creative Commons, Attribution 4.0 International (CC BY 4.0). You are free to:
copy and redistribute the material in any medium or format
Adapt — remix, transform, and build upon the material
⇒ for any purpose, even commercially.
 This course is designed by Clement Levallois.
Discover my other courses in data / tech for business: http://www.clementlevallois.net
Or get in touch via Twitter: @seinecle